
For Ludum Dare #35 we have made a game (“Biological Warfware”) with a really cool effect of walls that shift, morph and move all around. We received a couple of questions regarding how we achieved said effect so we decided to write a little tutorial for it. Ready? Let’s go!
Table of contents:
- A quick overview
- Understanding the effect
- Setting up multiple cameras
- Adding blur
- Camera to texure
- Display the texture
- Coloring
- Stroke effect
- Links
A quick overview
The effect is named metaballs and there are already many tutorials on the internet on how to achieve said effect. For all of you who are proficient in Unity, we’ll put it straight:
- Create a layer with stuff you need to “metaball”, remove that layer from main camera’s culling mask
- Create a camera with a culling mask of only that layer, set its output to a RenderTexture
- Put the RenderTexture on a quad for the main camera to see
- Put the alpha cutoff shader on the plane
- …
- Profit!
If you understood all of that – good job, you didn’t really need this tutorial. If you’ve had some problems or didn’t understand any of that – don’t fear, we have a more detailed description of what’s happening and how.
The effect
So what’s really happening under the hood? Basically, this:

Two semi-transparent circles are taken, combined and then everything that has low alpha values is discarded, while everything else is left.
How to get those circles in Unity? Well, the simplest way would be to blur circle (or any other shape) in Photoshop, import it and throw it on a GameObject, but you should remember, however, that sprites, that already have blur in them, create a potential scaling problem: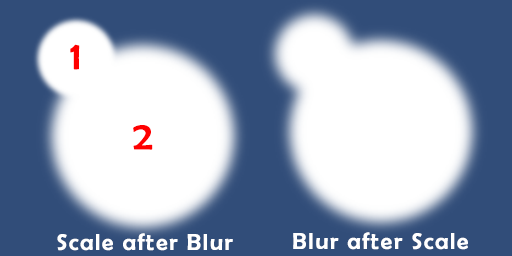
As you can see that small circle (1) has smaller blurred edge than circle (2), because it was scaled after blurring effect. To avoid this problem we can’t use blurred sprites, but instead we need to use solid edge sprites, scale them and only then apply blur (as shown on the right).
Now that the theory is out of the way, how do we do all of that in Unity?
Multiple cameras.
To achieve the mentioned effect, we will need two cameras. One will render the circles we need to blur, and the other Camera – everything else.
Let’s add circles first:
- Click GameObject → 2D Object → Sprite, and name it “Green Sprite” (2) (color doesn’t matter, actually).
- Add new Layer (3), call it “Effect Layer” and place sprite on it (4). This will separate all sprites included in effect from other game objects that don’t need this effect.
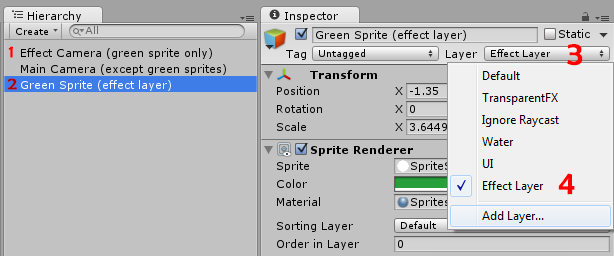
To create a camera, click GameObject → Camera. Name it something like “Effect camera” (1).
- Change the projection to Orthographic (the one for 2D)
- Change the position to X: 0, Y: 0, Z: -10
- Change the culling mask (5) (the layers which the camera sees) only to the “Effect layer” (6).
- Remove “Effect layer” checkmark from the main camera’s culling mask (to exclude original sprite from the view – we need only second camera view of it).
- Change its background (7) to a transparent color (we need only view of the sprite, not background)
- You can also delete GUI Layer, Flare Layer and Audio Listener components so that Unity Editor wouldn’t spam into console.

Now we have 2 cameras: Main camera that doesn’t see Sprites at all, and Effect Camera that sees only green sprites.
Adding blur.
Now we need to blur our Green Sprites and luckily for us Unity has such script built in. All you have to do is import it by going: Assets → Import package → Effects → Blur.cs and BlurEffectConeTap.shader. Add Blur.cs to Effect Camera and play with numbers a little.
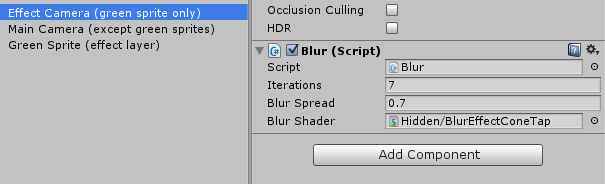
Your Game View should now display blurry circle – effect achieved!
Camera to texture.
Now we need to Cutout pixels with low alpha from the Effect Camera to reduce blurriness. But to do that we need to apply shader, which works only with Materials, and not Cameras. How do we convert Camera view to a Material? Let’s use RenderTexture:
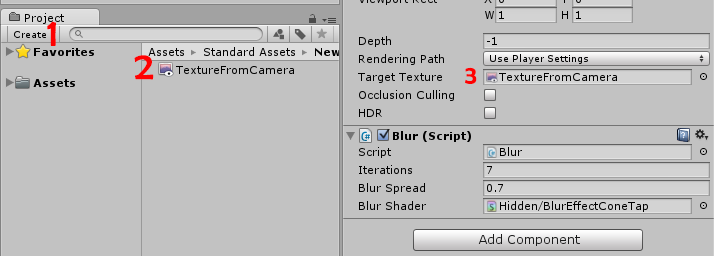
- Go to Assets folder, and Create (1) → Render Texture (2). Let’s call it “TextureFromCamera”
- Set size of the texture to 1024×1024 (find what works for you best)
Note: Size of the texture is important! The bigger the size, the more detailed the resulting picture will be, but the slower it will be processed!
- Drag it to the Target Texture field on Effect Camera (2 to 3).
If you’ve done everything correctly, selecting the Effect Camera in the hierarchy will show the preview of green circle (effect texture will show you the same), yet they will not appear in the Game view. That’s because circles are on a layer that the main camera does not “see”, but the Effect Camera does see them and then render to the TextureFromCamera. Sweet, now let’s bring our circles back to the Game View.
Displaying the Texture.
Ok, we’ve got the circles on a texture, how do we show it to the main camera? By using a quad (or a plane) with a material.
- Add a quad to the scene by clicking GameObject → 3D object → Quad
Note: Keep Quad/Plane with same size ratio as your TextureFromCamera, or final result can get distorted. Which means that if you need Texture to be 1024×512, then you need Quade to be 2:1 size, but NOT SCALE! Scale still should be at 1:1 ratio. Check this Package if you want to build such Quad in Unity.
- Set the quad’s scale to X: 10, Y: 10 (ration is still 1:1).
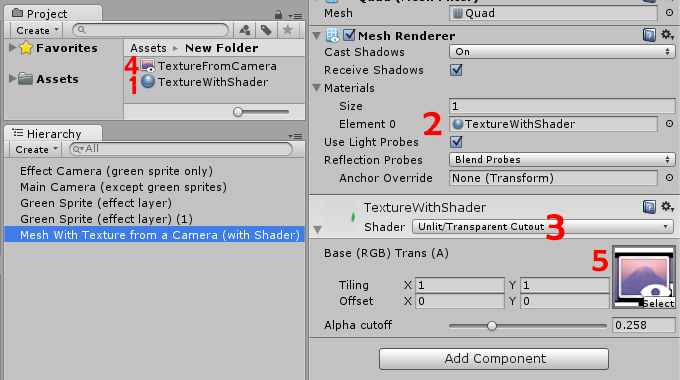
- Add a material (1) by clicking Assets → Create → Material.
- Apply the newly created material to the quad (1 to 2)
- Change material’s shader to Unlit → Transparent Cutout (3)
- Drag and drop your TextureFromCamera onto the texture box to the right (4 to 5)
Woah! Did it just… work? If it did (it must have) then you can play with the alpha cutoff slider and see how it looks. Duplicate first sprite to see how effect work:
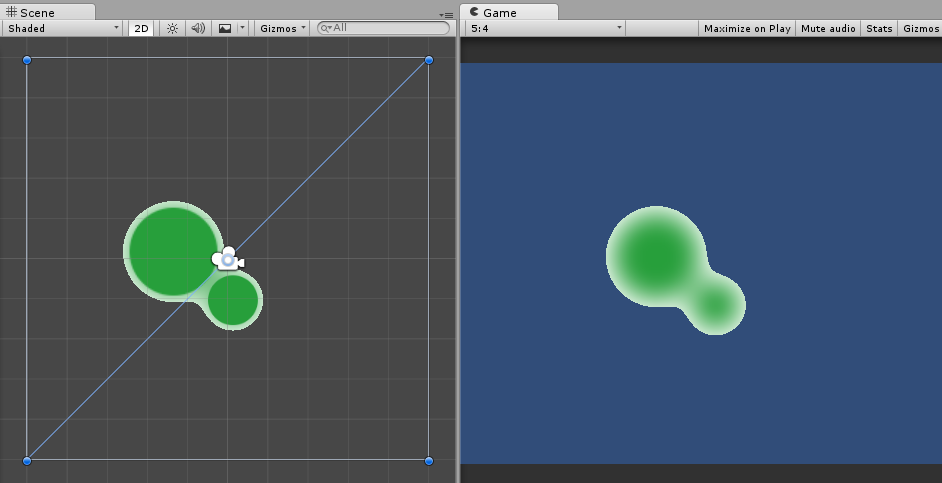
Let’s recap: the effect camera looks at the effect layer, blurs everything and then renders onto a render texture. The render texture is then passed to the material and shown on a quad, which is visible to the main camera – that’s why it all finally appears in the game view. And the shader of said material simply discards all the pixels that have alpha less that 0.5. Or whatever you have set on that slider. Neat.
Coloring.
It looks great, but still not good enough, because we have yet to take control of the colors. We can’t change the built-in shader so let’s grab its source code from here (click the Download button, choose “Built in shaders”, unpack, search for “Unlit-AlphaTest.shader” and move it to the project asset folder in Unity). Done! Now we have a shader that we can ruin!
First of all, change
Shader "Unlit/Transparent Cutout" {
To
Shader "Custom/Transparent Cutout" {
This will differentiate our shader from built-in one and show it in a different submenu. You can test that by changing the shader on the material.

Ok, now let’s add support for Color.
Properties {
    _MainTex ("Base (RGB) Trans (A)", 2D) = "white" {}
    _Cutoff ("Alpha cutoff", Range(0,1)) = 0.5
    _Color ("Main color", Color) = (1,1,1,1)
}
_Color should now be initialized not only in the header, but in the shader code also.

Search for the following code part and add the initialization:
sampler2D _MainTex;
float4 _MainTex_ST;
fixed _Cutoff;
half4 _Color;
And your frag function should look like this:
fixed4 frag (v2f i) : SV_TARGET {
    fixed4 col = tex2D(_MainTex, i.texcoord);
    clip(col.a - _Cutoff);
    col = _Color;
    return col;
}
Switch back to the editor and you’ll see that it is now possible to select a color which will be shown in the game. Awesome!

Stroke effect.
We have successfully changed the color of those sprites, but there’s no stroke! Well, the stroke is easily achieved by adding one more alpha threshold and a color, so that everything with alpha between zero and StrokeAlpha is discarded, everything between StrokeAlpha and MainAlpha is shown in stroke color and everything else is shown in main color. Open up the shader once more and add two new variables to the Properties:
_Stroke ("Stroke alpha", Range(0,1)) = 0.1
_StrokeColor ("Stroke color", Color) = (1,1,1,1)
Add initialization for those variables:
sampler2D _MainTex;
float4 _MainTex_ST;
fixed _Cutoff;
half4 _Color;
fixed _Stroke;
half4 _StrokeColor;
And modify the frag function a little bit:
fixed4 frag (v2f i) : SV_TARGET {
    fixed4 col = tex2D(_MainTex, i.texcoord);
    clip(col.a - _Cutoff);
    if (col.a < _Stroke) {
        col = _StrokeColor;
    } else {
        col = _Color;
    }
    return col;
}
Going back to the editor and… voilà!
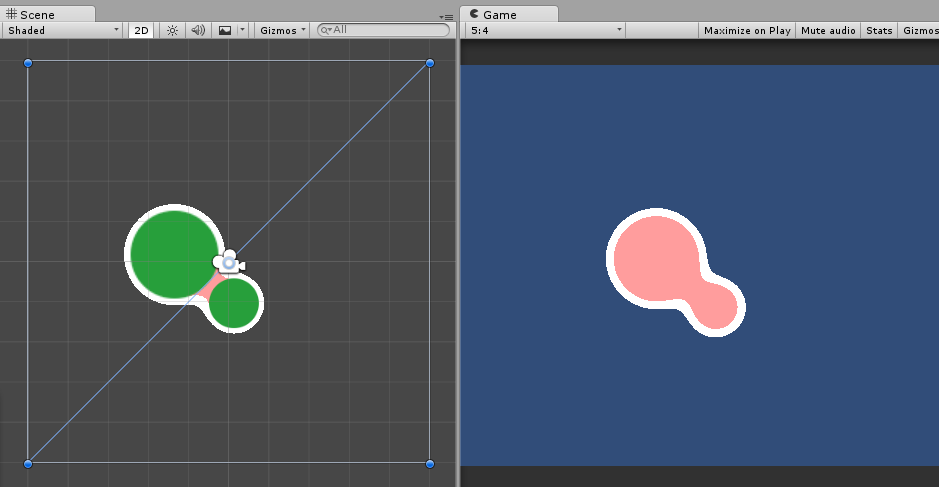
If you want another stroke, you can add even more variables in the same way and configure them all to your liking. All that’s left is writing some code to move those circles so that they could come to life.

Add more sprites, add movement/scale/rotation to them, and you can end up with this picture:

Download
You can download Unity source project here.
You can download the original Unlit/Transparent Cutout shader here.
You can play “Biological Warfare” here.
One really nice guy has read our tutorial and decided to improve it by combining the Blur shader with Cut Out shader and removing the need for Render Texture in the process. In theory, this should make the effect faster, as well as easier to use. You can check it here.